CALLING ALL YARNLOVERS! A New Bobble Stitch Cardigan Pattern
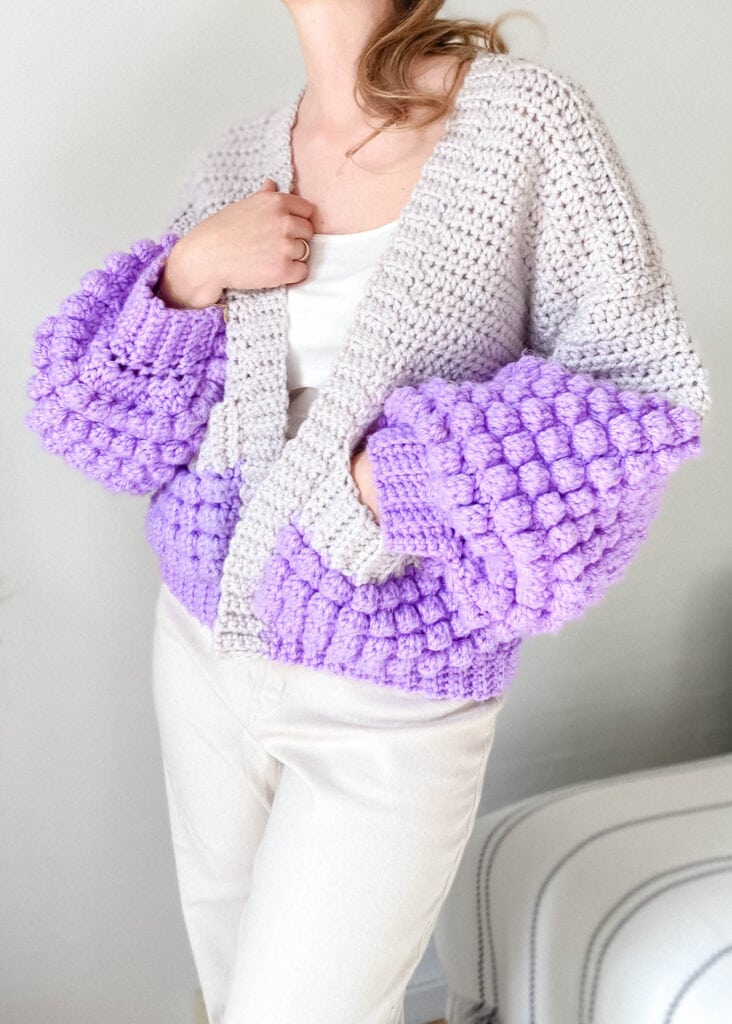
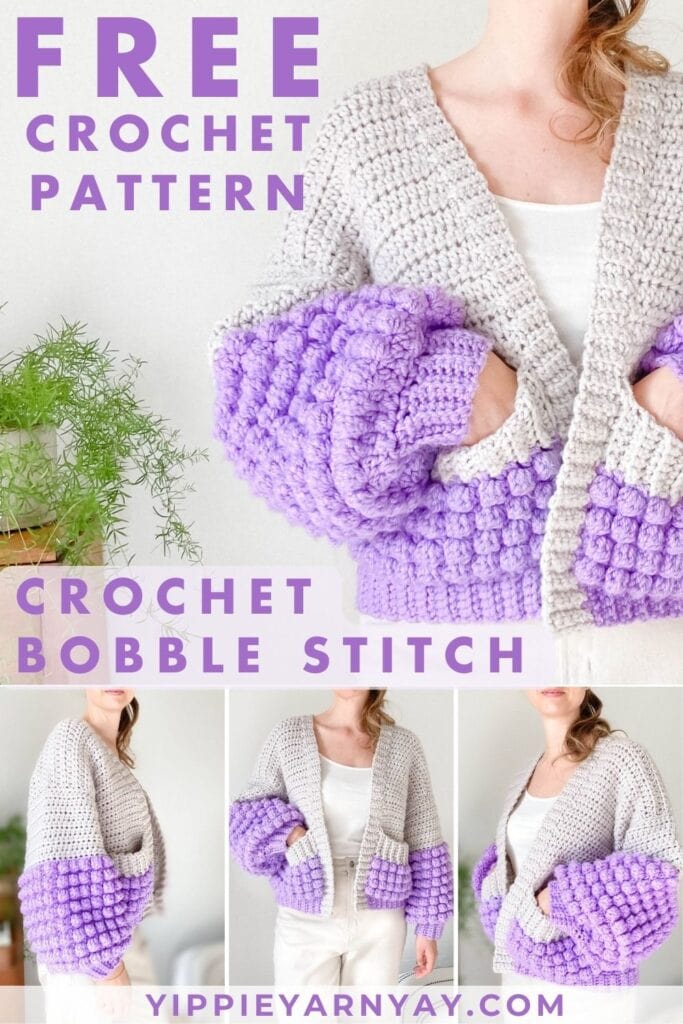
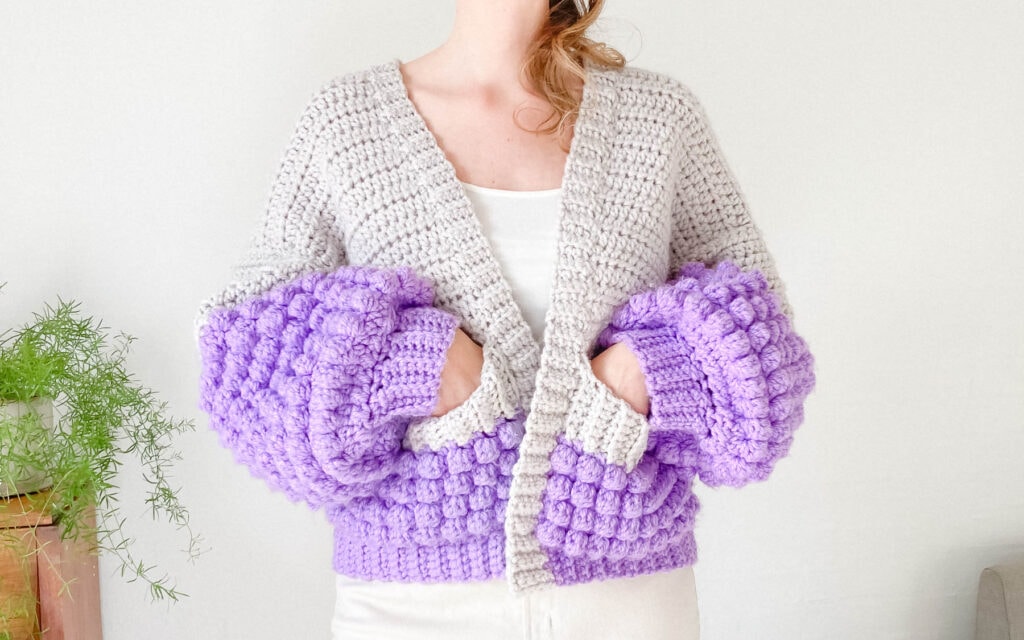
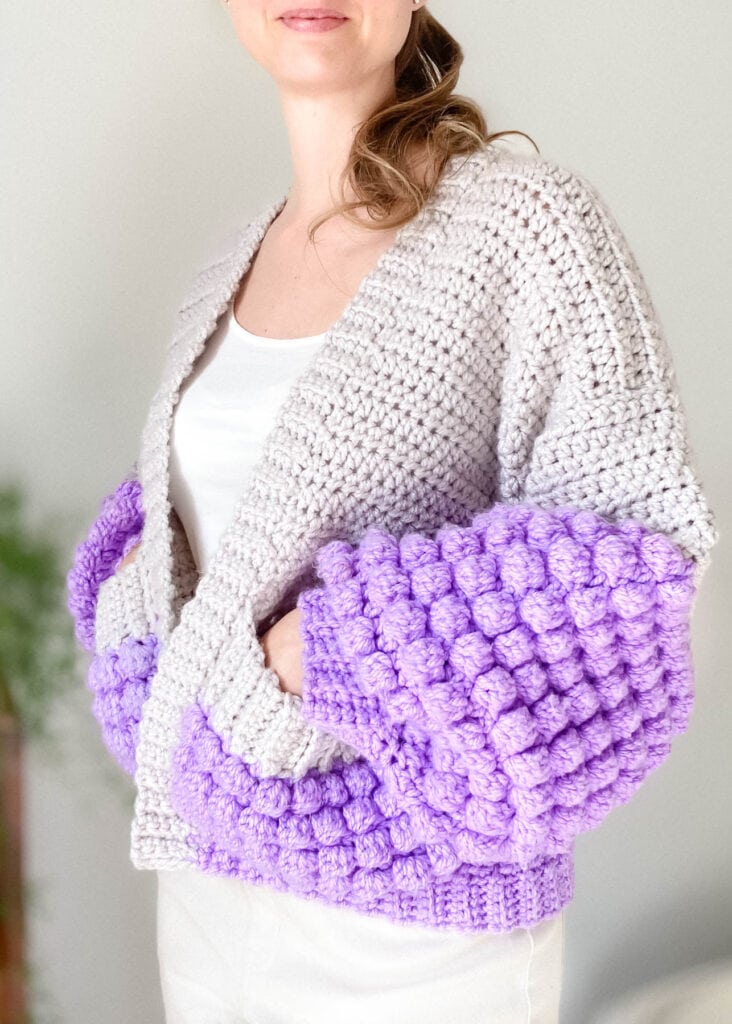
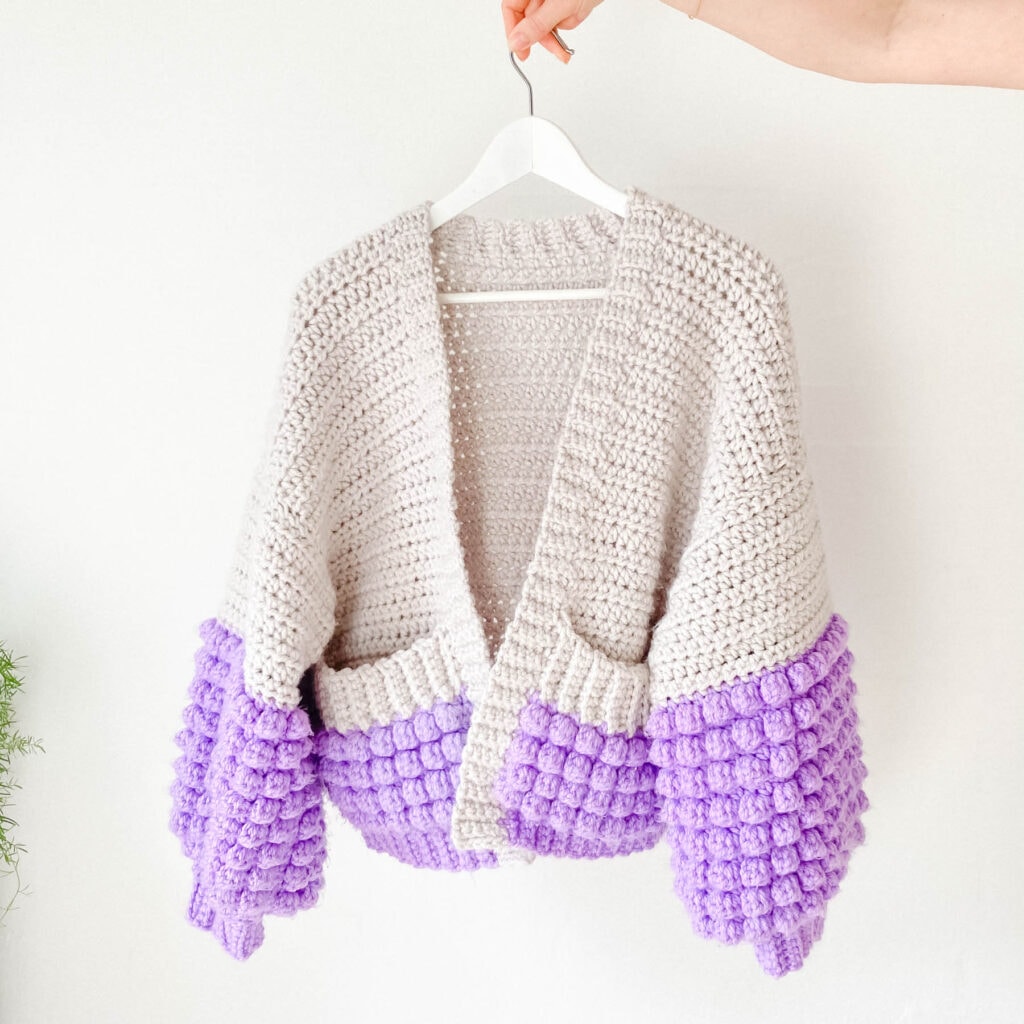
Here’s the FREE crochet pattern for The Hubba Bubba Cardi. It’s a super cute oversized, bobble stitch cardigan! You’re gonna love it 🥰
Get the free pattern below or purchase the ad-free printable PDF: my store (best price), Etsy or Ravelry.
This site contains affiliate links. Please read full disclosure here.
Bobbles, bobbles, bobbles! Who doesn’t love lots of crochet bobbles?!
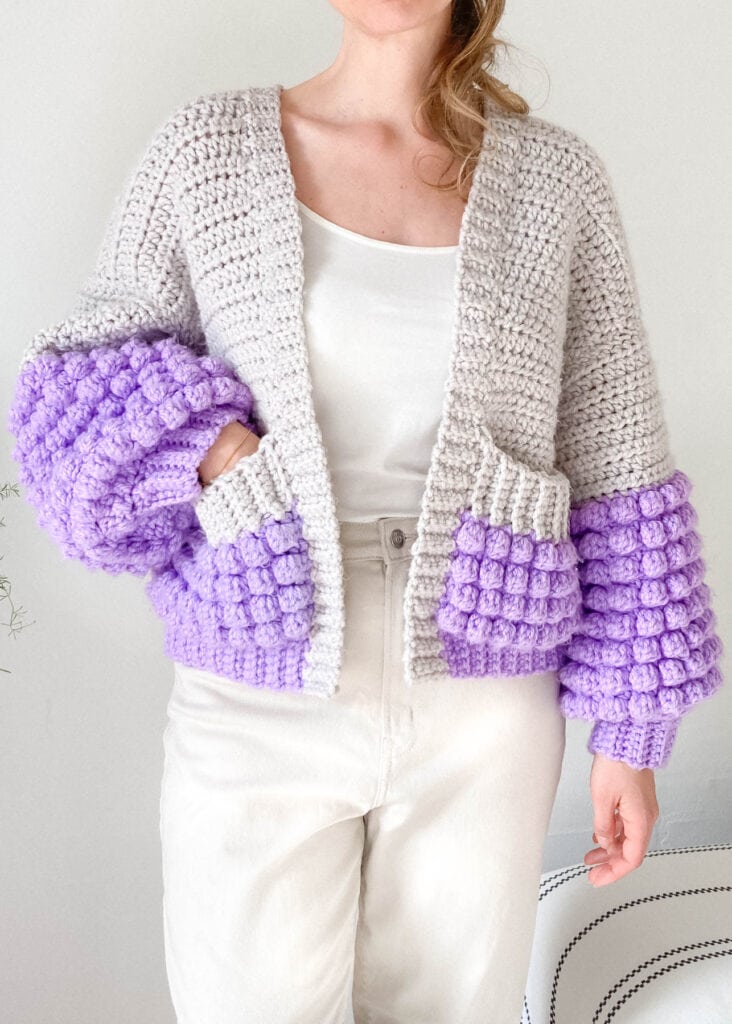
The Hubba Bubba Cardi combines 3 of many crocheters’ favorite things: simple crochet stitches, pretty colors, and lots of giant crochet bobbles.
It’s so pretty with a cute dress, it’s trendy and cool with jeans and a tee and it’s cozy on a cold day. It’s great for any season. You name it, this cardigan has got it 🥰
Let’s go crochet the bobble stitch cardigan!
PIN MED FOR LATER!
Inspiration for this bobble stitch cardigan: The Hubba Bubba Cardi
Believe it or not, gum was the inspiration for this cardigan 😄
Do you remember chewing bubble gum as a child? Blowing those giant colorful, yummy bubbles was so much fun! Maybe you even remember Hubba Bubba gum?
So how do you convert gum bubbles to crochet? The bobble stitch! It totally looks like bubble gum. Especially when you use a fun color. It’s a really fun stitch to crochet and it adds such a pretty texture to your crochet work.
That is pretty much the inspiration for making this crochet cardigan and covering it with lovely crochet bobbles.
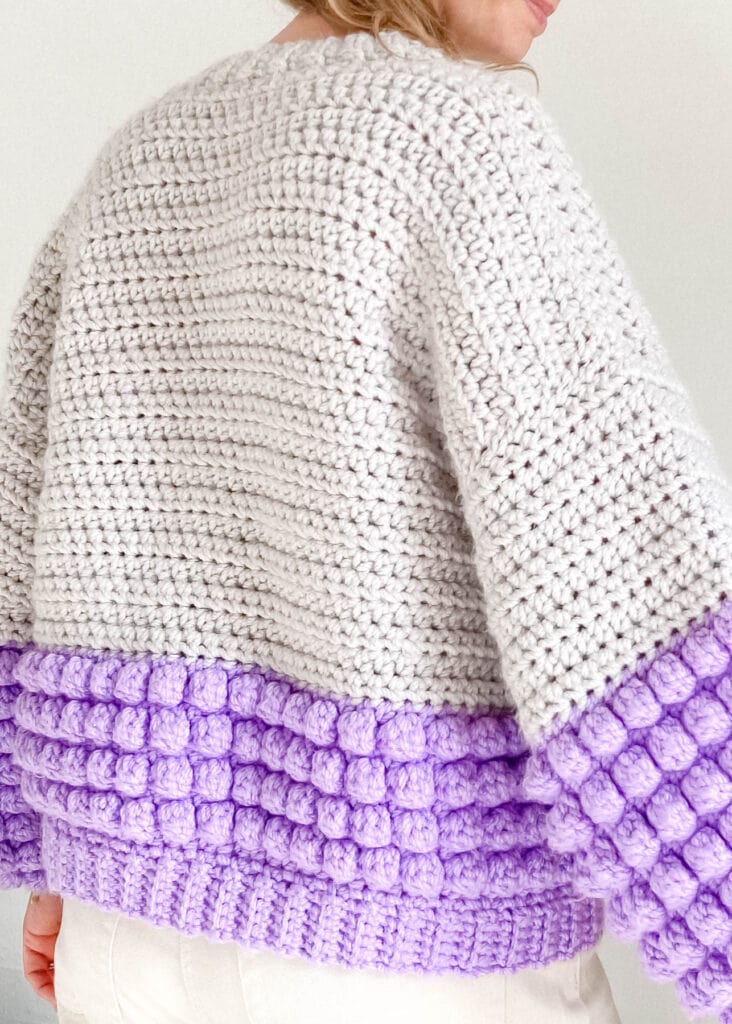
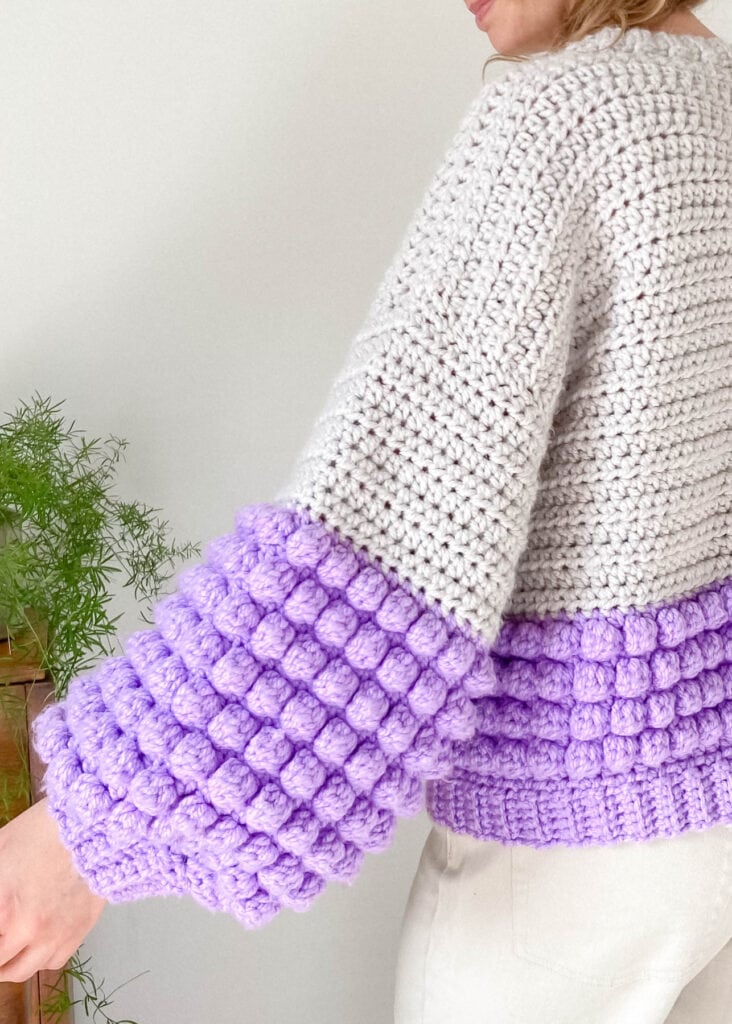
To enhance the bubble effect I decided to go with chunky yarn for the cardigan. The crochet bobbles weigh more than regular crochet stitches. That’s why they are placed at the bottom part of both the sleeves and the body and add a great drape to the cardigan.
All of this combined turned into The Hubba Bubba Cardi, a wonderful bobble stitch cardigan 🥰
Construction
The Hubba Bubba Cardi is constructed in a very simple way. The pattern is also written in an easy-to-understand way.
The cardigan is made from two front panels, one back panel and two sleeves. They are all worked in rows using a super simple 1 and 2-row repeat.
You start by making the front panels and then the back panel. Then you make the sleeves. They might seem a bit too big, but remember that this is a bobble stitch cardigan and it is supposed to be like that. So don’t worry. It’ll make sense once you start assembling it.
Now it’s time to make the pockets. Oh, those big LOVELY pockets. They are also filled with crochet bobbles and make your bobble stitch cardigan even more fun and cozy.
Once you’re done crocheting all the parts you sew them together and crochet the ribbing along the opening and bottom of the cardigan directly onto your cardi. Easy peasy 😁
Personal adjustments
You can easily adjust the length of both the body and the sleeves of your crochet cardigan to adjust how chunky it looks. If you do so, remember to adjust the size of the pockets too. All you have to do is this:
- For the body panels: Add more rows with crochet bobbles stitch and hdc until you reach the desired length of your candigan.
- For the sleeves: Add more rows of crochet bobbles and hdc before the decrease row.
- For the pockets: Just add more rows of crochet bobbles and hdc until they match up with the number of rows of bobbles and hdc on your back panel.
Prefer a clean printable version? Purchase the ad-free, printable PDF on my store (best price), Etsy or Ravelry ☺️🧶
Skill level
Intermediate
Sizing and measurements
These are the finished measurements of your garment, not your body measurements. Keep in mind that The Hubba Bubba Cardi is an oversized, chunky garment.
Sizes S/M (L/XL, 2XL/3XL)
Sizes in inches:
Length – measured from neck to bottom:
21 (22 1/5, 22 1/5)
Width – measured just below the sleeves:
23 (26 1/2, 30)
Sleeve length – measured towards wrist:
17 (18 1/2, 18 1/2) (same for all sizes)
Sizes in cm:
Length – measured from neck to bottom:
54 (57, 57)
Width – measured just below the sleeves:
58 (67, 76)
Sleeve length – measured towards wrist:
43 (46, 46) (same for all sizes)
The model in the picture is wearing a size S/M.
Tools
I’ve linked the ones I like to use right here:
Crochet hooks 6 mm and 7 mm
Darning needle
Scissors
Stitch markers
Yarn
Hobbii Amigo Chunky
Yardage: 100 grams = 100 meters (109 yds)
Color code: Titanium (A07) and Lavender (A59)
Hobbii Amigo Chunky is a super soft, high-quality acrylic yarn and it’s like a dream to work with. Since this yarn so chunky you get the most bubble-licious crochet bobbles ever to cover your cardigan. Also, it’s impossible not to find a color you love because this yarn comes in so many gorgeous shades so you can make your own bobble stitch cardigan just the way you love it😍
MATERIALS
Color A – Titanium: S/M (L/XL, 2XL/3XL): 6 (8, 9) skeins
Color B – Lavender: S/M (L/XL, 2XL/3XL): 7 (9, 10) skeins
ALTERNATIVES
Other Bulky / Chunky / 12 ply / 5-weight yarn.
Gauge
(This is an expression of how tight your work is)
4” / 10cm square = 10 stitches wide x 6 rows tall in hdc using hook size 7 mm
Always make a test before you begin. If the gauge does not match the specified crochet hook, try changing to a larger or smaller one so that you find the hook with which you can achieve the specified gauge.
Pattern notes
Stitch counts for the different sizes are written in the order:
S/M (L/XL, 2XL/3XL)
At the end of each row you can see the total number of stitches for each size as follows:
E.g. for the back panel:
[ 49 (57, 65) ]
Note: When the pattern says to ch 1 at the beginning of a row it does not count as a sc or a hdc. It’s simply a turning ch. Do not make this ch too tight, or else the pieces will wrinkle.
Note: The total number of rows for the front panels and back panel is not the same. This is because you work with only hdc on the front panels and both sc, hdc and dc on the back panel. So to make all three panels the same size you work one number of total rows on the front panels and another on the back panel.
The instructions for the ribbing at wrist, bottom and opening of the cardigan apply for all sizes.
Always read the pattern thoroughly. You will find an explanation of all abbreviations below, both US and UK terms. The pattern uses US terms.
Abbreviations
st(s): stitch(es)
ch: chain
sc: single crochet (UK double crochet)
sl st: slip stitch
hdc: half double crochet (UK half treble crochet)
sp(s): space(s)
blo: back loop only
bo: crochet bobbles – 4 unfinished dc in same st, like this:
- Yarn over, insert hook into stitch and pull up a loop. Yarn over, pull through two.
- Repeat no 1 in the same stitch until you have a total of 5 loops on your hook.
- Yarn over, and pull through all 5 loops at once.
Pssst! Download the FREE Crochet Stitch Abbreviation Guide. It contains information about abbreviations in 6 different languages.
Share your projects
I love to see your finished projects and WIPs! Use #hubbabubbacardi #yippieyarnyay and tag @yippieyarnyay on social media to show off your work and your process while you’re crocheting
Now let’s get started making your new best friend & bobble stitch cardigan😊
Looking for more free crochet patterns?


Bobble stitch cardigan pattern instructions
Body
The body consists of five pieces: a left front panel, a right front panel, a back panel and two pockets.
Front panels
Make 2 – a left and a right panel. The panels are identical.
Use color A. Use hook 7 mm. Worked in the rows. Ch 19 (21, 27).
Row 1: Start in 2nd ch from hook, 1 hdc in each st across, turn [ 18 (20, 26) ]
Row 2: Ch 1 (does not count as a hdc), start in 2nd ch from hook, 1 hdc in each st across, turn [ 18 (20, 26) ]
Row 3-33: Repeat row 2 – total: 31 times [ 18 (20, 26) ]
Only for sizes L/XL and 2XL/3XL:
Row 34-35: Repeat row 2 [ 20 (26) ]
Break the yarn and weave in ends.
Back panel
Use color A. Use hook 7 mm. Worked in the rows. Ch 50 (58, 66).
Row 1: Start in 2nd ch from hook, 1 hdc in each st across, turn [ 49 (57, 65) ]
Row 2: Ch 1 (does not count as a hdc), start in 2nd ch from hook, 1 hdc in each st across, turn [ 49 (57, 65) ]
Row 3-25: Repeat row 2 – total: 23 times [ 49 (57, 65) ]
Change to color B.
Row 26: Repeat row 2 [49 (57, 65) ]
Row 27: Ch 1, start in 2nd ch from hook, * 1 sc, 1 bo in next st*, repeat from * to * until you have 1 ch left, 1 sc in last st, turn [ 49 (57, 65) ]
Row 28-33: Repeat row 2 and 27 – each row is repeated 3 times [ 49 (57, 65) ]
Row 34: Repeat row 2 [ 49 (57, 65) ]
Only for sizes L/XL and 2XL/3XL:
Row 35-36: Repeat row 2 and 27 [ 57 (65) ]
Break yarn and weave in ends.
Pockets
Make 2.
Use color A. Use hook 7 mm. Worked in the rows.
Start by making the ribbing. Ch 7.
Row 1: Start in 2nd ch from hook, 6 sc, ch 1, turn [ 6 ]
Row 2: 6 sc in blo, ch, turn [ 6 ]
Row 3-21 (-23, -28): Repeat row 2 – total: 19 (21, 26) times [ 6 ]
Change to color B. Add the yarn in the last st on the last row of the ribbing.
Row 1: Divide 19 (21, 27) hdc evenly along the long side of the ribbing, turn [19 (21, 27) ]
Row 2: Start in 2nd ch from hook, * 1 sc, 1 bo in next st*, repeat from * to * until you have 1 ch left, 1 sc in last st, turn [19 (21, 27) ]
Row 3: Ch 1, start in 2nd ch from hook, 1 hdc in each st across, turn [19 (21, 27) ]
Row 4-9: Repeat row 2 and 3 – each row is repeated 3 times [19 (21, 27) ]
Only for size S/M:
On row 9 hdc the last 2 sts together [ 18 ]
Only for sizes L/XL and 2XL/3XL:
Row 10-11: Repeat row 2 and 3 [ 20 (27) ]
On row 11 hdc the last 2 sts together [ 19 (26) ]
Break the yarn and weave in ends.
Sleeves
Make 2.
Use color A. Use hook 7 mm. Ch 44 (46, 50)
Row 1: Start in 2nd ch from the hook, 1 hdc in each st across, turn [ 43 (45, 49) ]
Row 2: Ch 1, 1 hdc in each st across, turn [ 43 (45, 49) ]
Row 3-9: Repeat row 2 – total: 7 times [ 43 (45, 49) ]
Change to color B.
Row 10: Repeat row 2 [ 43 (45, 49) ]
Row 11: Ch 1, *1 sc, 1 bo in next st*, repeat from * to * until you have 1 st left, 1 sc, turn [ 43 (45, 49) ]
Row 12-25: Repeat row 2 and 11 – each row is repeated 7 times [ 43 (45, 49) ]
Row 26: Repeat row 2 [ 43 (45, 49) ]
Only for size S/M:
Row 27: Ch 1, 1 hdc in first st, 2 hdc together all the way across, turn [ 22 ]
Only for sizes L/XL and 2XL/3XL:
Row 27-28: Repeat row 2 and 11 [ 45 (49) ]
Row 29: Ch 1, 1 hdc in first st, 2 hdc together all the way across, turn [ 23 (25) ]
Do not break yarn. Continue making the ribbing at the wrist.
Ribbing at wrist
Change to hook 6 mm. Ch 7.
Row 1: Start in 2nd ch from hook, 6 sc, 2 sc along the wrist, turn.
Row 2: Skip 2 sc, 6 sc blo, ch 1, turn.
Row 3: 6 sc blo, 2 sc along the wrist, ch 1, turn.
Repeat row 2 and 3 all the way until you have 1 st left. You end with making row 2.
Continue like this:
6 sc in blo towards the wrist. Sc in the last hdc along the wrist.
Fasten off and weave in all ends.
Now continue to assemble your pretty chunky cardigan before you start crocheting the ribbings for the edges.
Assembly
Now it’s time to sew your cardigan together.
I recommend that you use whip stitch to sew your cardigan together, but you can use pretty much any kind of stitch you like.
Start with the body panels
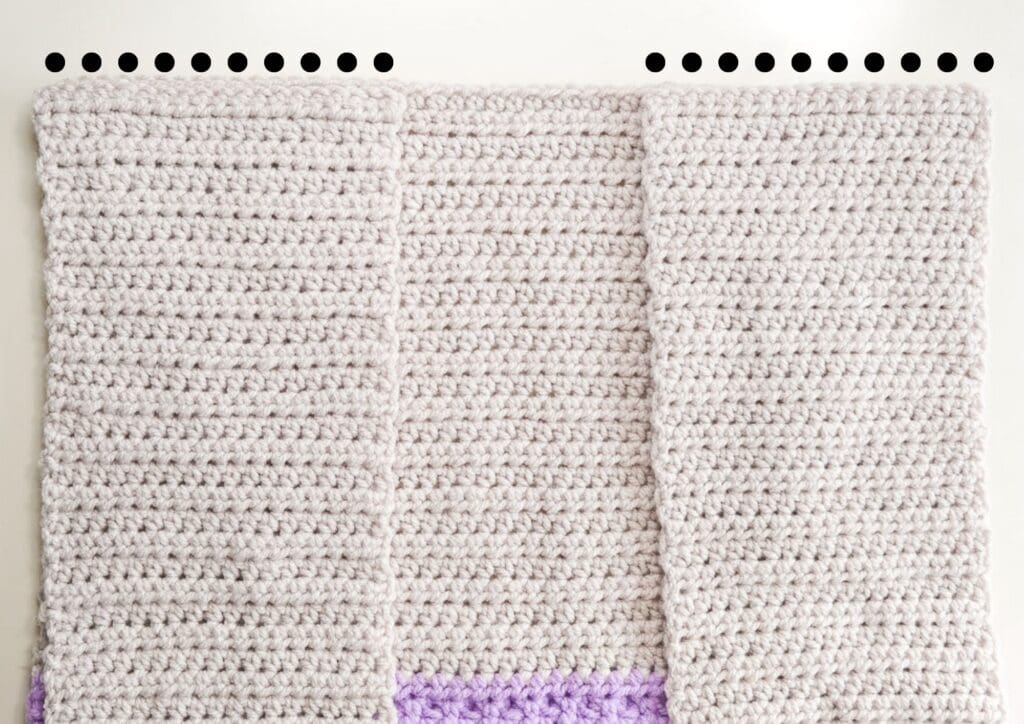
Lay the front panels on top of the back panel.
Thread a darning needle with a leftover piece of yarn, color A, approx. 40” / 100 cm.
Now whip stitch the shoulders together as shown in the picture below.
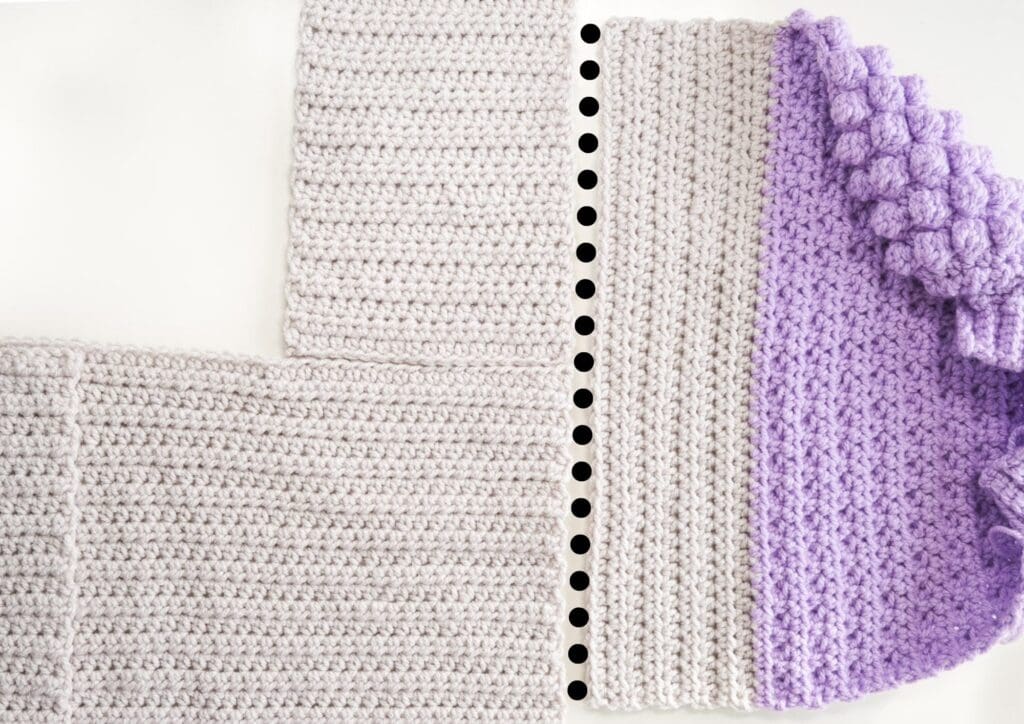
Attaching the sleeves
Find the middle of your sleeves and mark it with a stitch marker. Make sure that the middle of the sleeves are exactly where the shoulders are sewn together. Sew on the wrong side.
Thread the needle with a leftover piece of yarn, color A, approx. 80” / 200 cm.
Whip stitch the sleeves on as shown in the picture below.
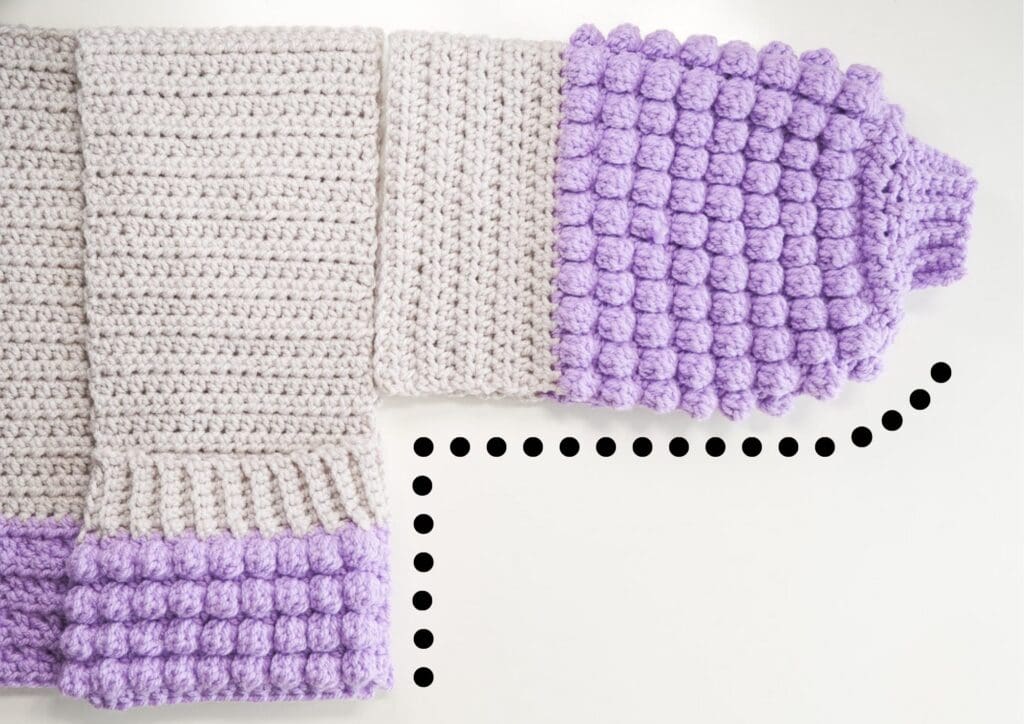
Sewing sleeves, sides and pockets
Now fold your cardigan. Lay the pockets on the front panels. Thread the needle with a piece of yarn, color B, approx. 42” / 110 cm.
Start whip stitching the sleeves at the wrist. Stop sewing when you reach color A. Weave in ends.
Thread the needle with a piece of yarn, color A, approx. 42” / 110 cm. Whip stitch the rest of the sleeves and then the body panels together towards the pocket. Stop sewing when you reach color B. Weave in ends.
Thread the needle with a piece of yarn, color B, approx. 24” / 60 cm. Whip stitch the rest of the body with the pockets. Be aware to sew through all three layers– back panel, front panel and pocket. Weave in ends.
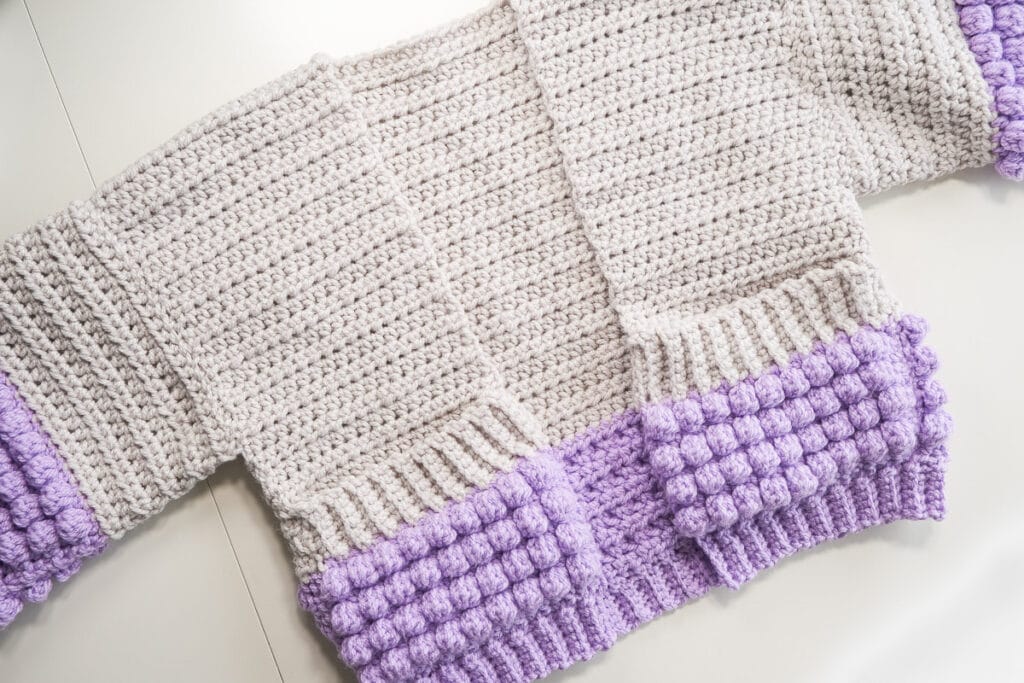
Once you have sewn all the pieces together, continue making the ribbing at the bottom of the cardigan. Work on the right side.
Ribbing at bottom
Use color B. Use hook 6 mm.
Add the yarn at the beginning of the left front panel. Ch 6.
Be aware to work both in the pocket and the left front panel at the same time.
Row 1: Start in 2. ch from hook, 5 sc, 2 sc along the bottom, turn.
Row 2: Skip 2 sc, 5 sc blo, ch 1, turn.
Row 3: 5 sc blo, 2 sc along the bottom, ch 1, turn.
Repeat row 2 and 3 all the way around the bottom. You end with making row 2.
Continue like this:
5 sc in blo towards the edge of the right front piece. Sc in the last st along the bottom, turn. Skip 1 st, 5 sc blo.
Fasten off and weave in all ends.
Continue along the edge of the opening of the cardigan.
Ribbing along opening
Use color A. Use hook 6 mm.
Add the yarn at the beginning of the ribbing on the right front piece. Ch 5.
Divide the following sts evenly and, as you go, make sure your work is not too tight nor too loose.
Row 1: Start in 2. ch from hook, 4 sc, 2 sc along the bottom, turn.
Row 2: Skip 2 sc, 4 sc blo, ch 1, turn.
Row 3: 4 sc blo, 2 sc along the bottom, ch 1, turn.
Repeat row 2 and 3 all the way around the bottom. You end with making row 2.
Continue like this:
4 sc in blo towards the edge of the ribbing on the left front piece. 1 sc in the corner of the ribbing, turn. Skip 1 st, 4 sc blo.
Fasten off and weave in ends.

Share your finished long crochet cardigan
Enjoy your crochet day! 🧶
xx Sharlene
If you enjoyed this pattern, you may also like these patterns
- Monday Sweater – Chunky and cozy
- The Chunky Crochet Sweater
- The Star Cluster Tee – Cute crochet summer top
- The Cadence Cardigan – Gorgeous color block cardi
- Everyday Easy Crochet Cardigan – Perfect for beginners
Follow me:
Sharing is caring: