Best Free Beginner Sweater Pattern for an Easy Sweater
Are you a beginner or just looking for a super easy crochet sweater patten? Then try the free crochet pattern for The Chunky Balloon Sweater.
Get the free pattern below or purchase the ad-free printable PDF: My store (best pice), Etsy or Ravelry.
This site contains affiliate links. Please read full disclosure here.
Need an easy crochet sweater?
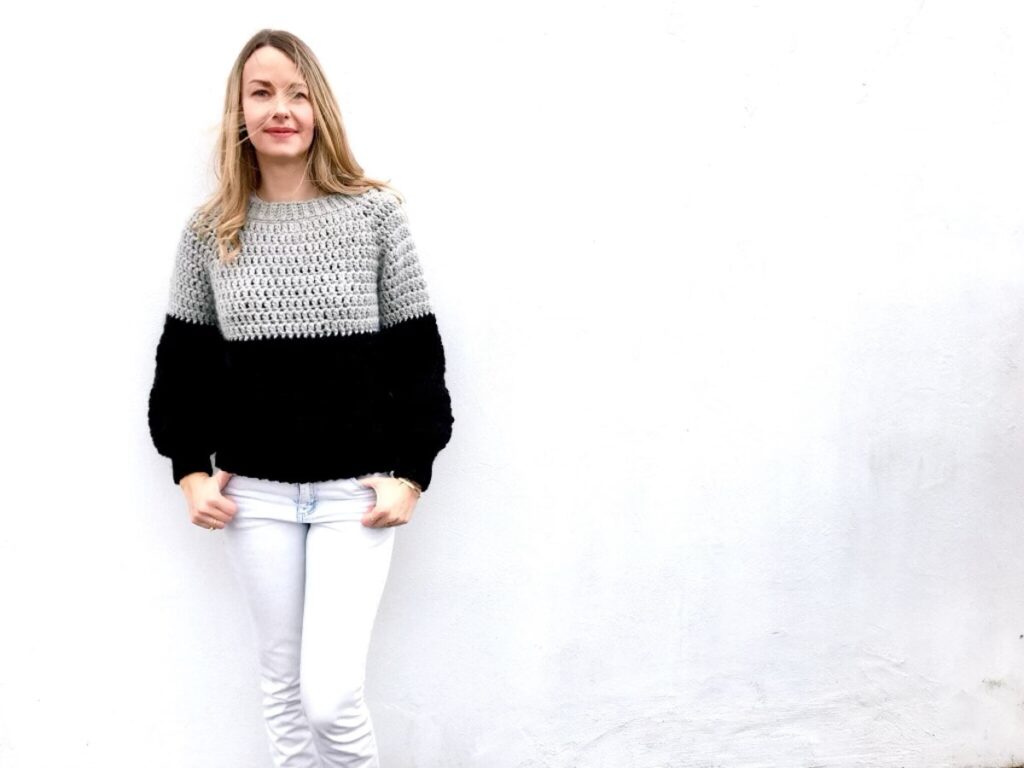
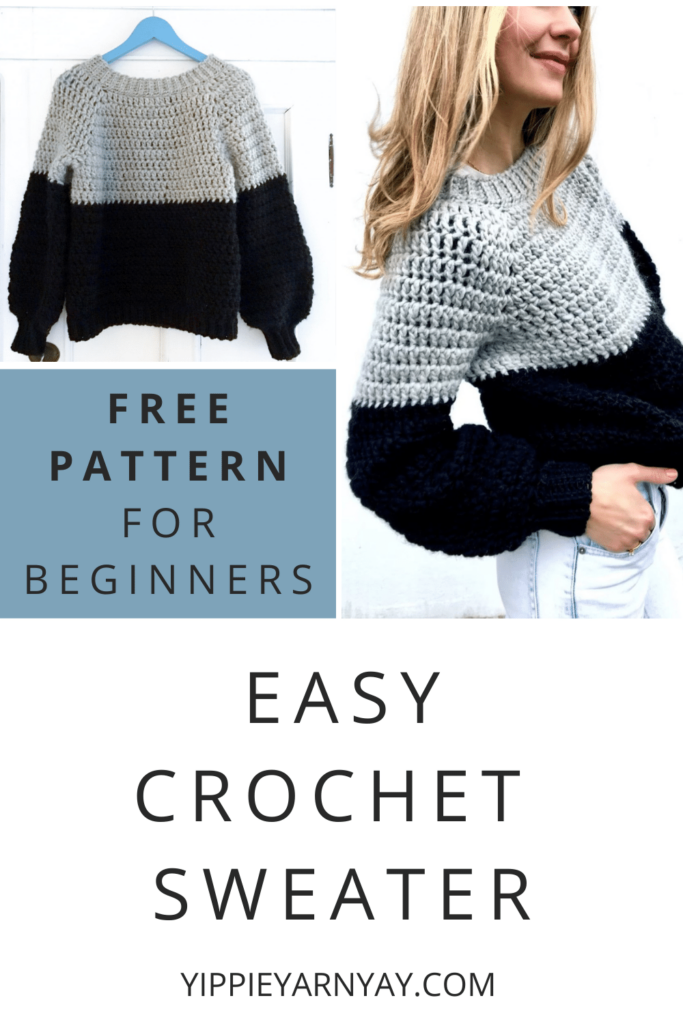
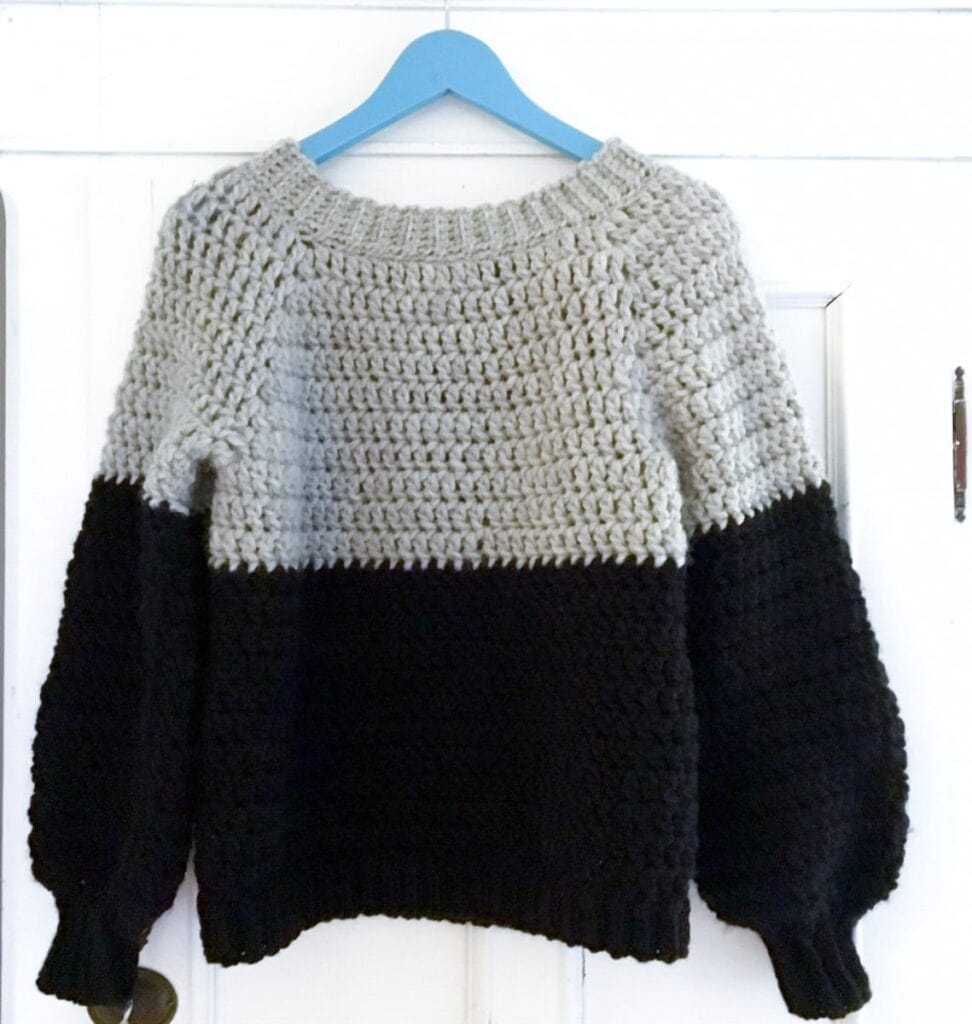
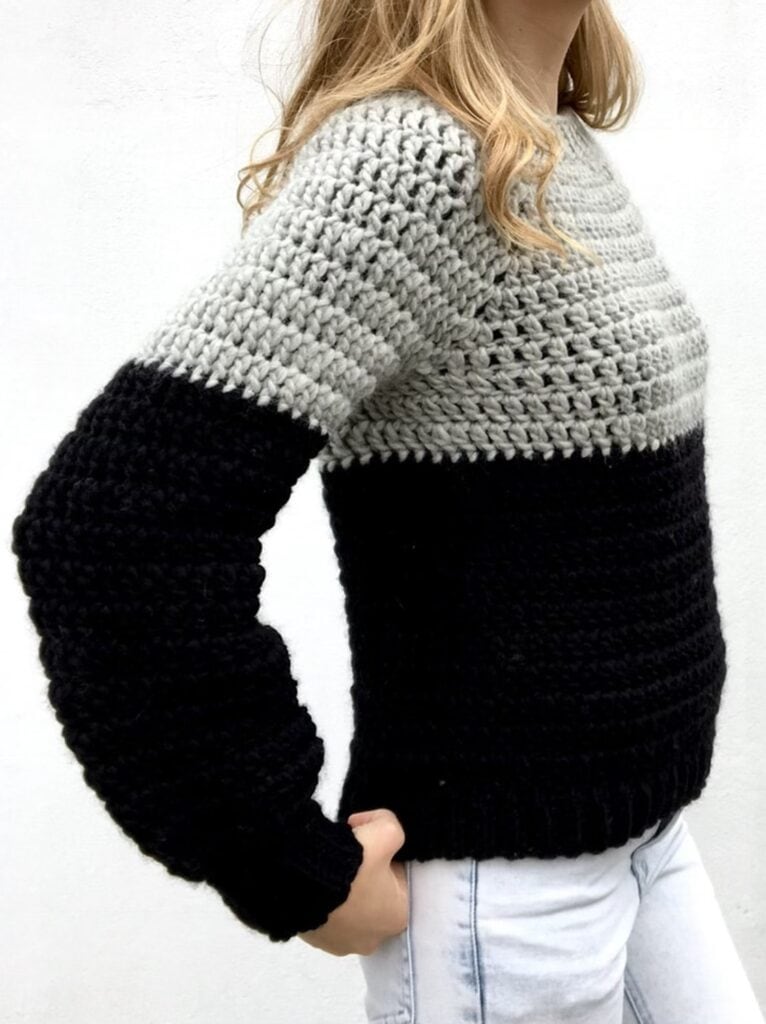
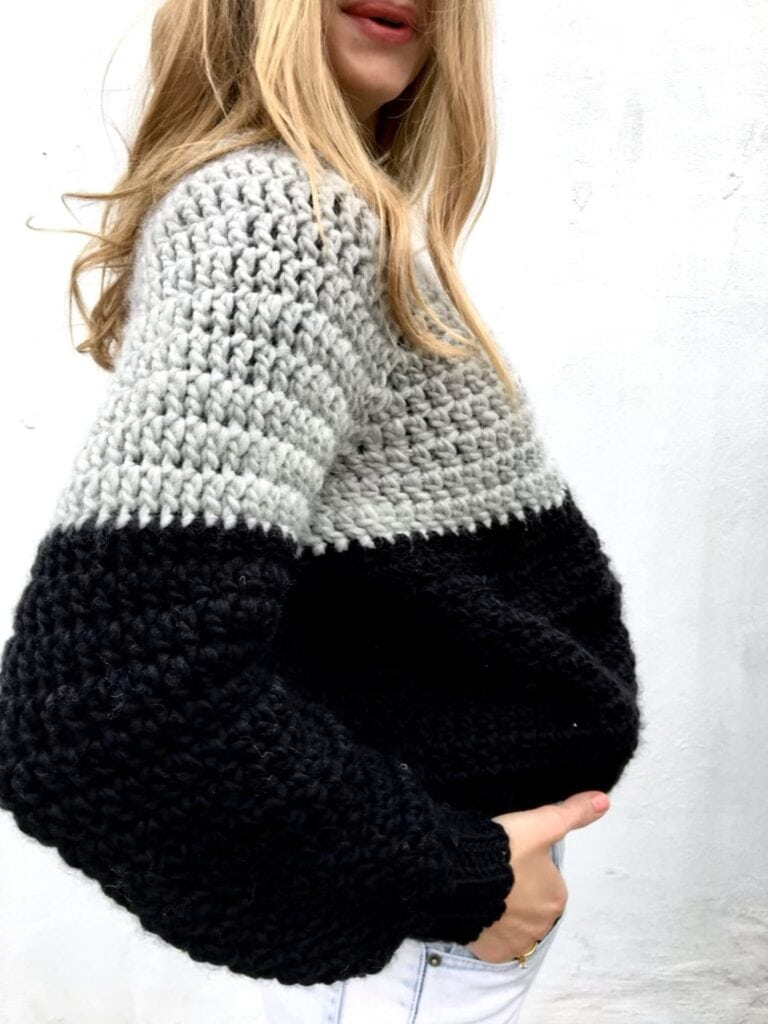
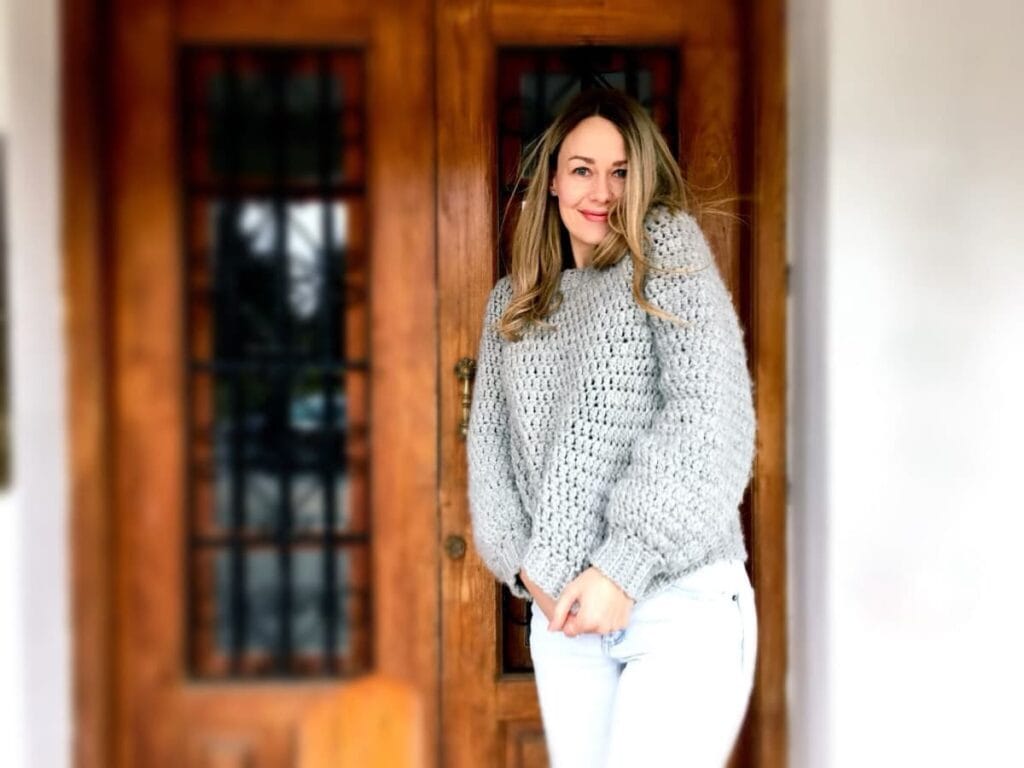
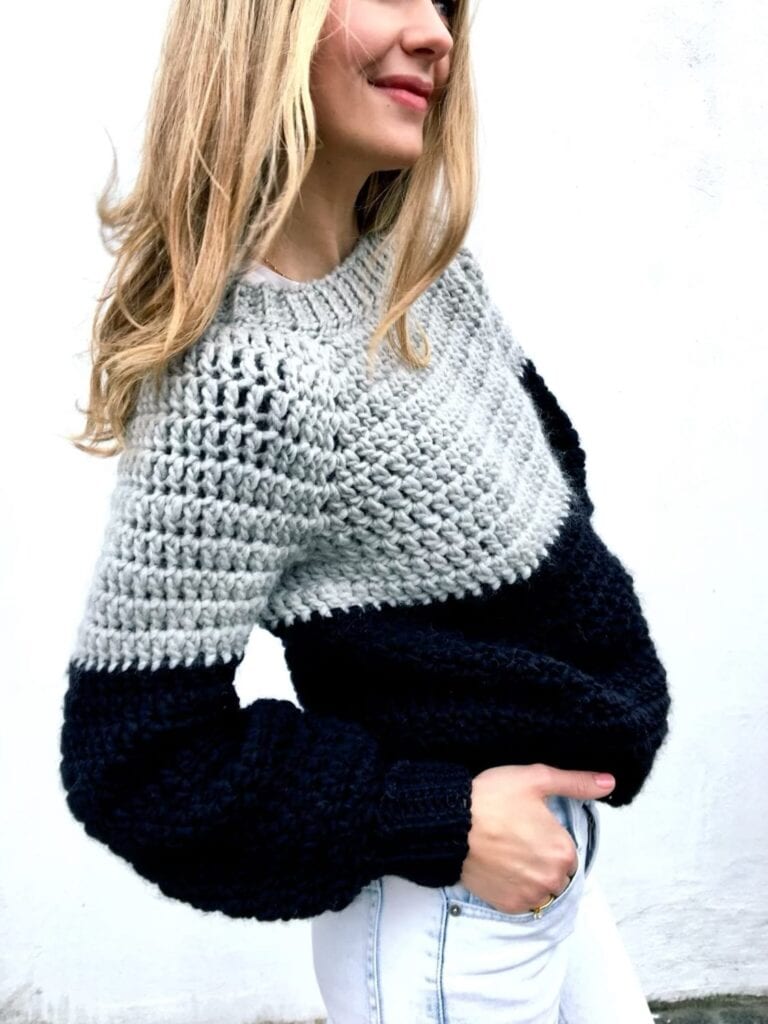
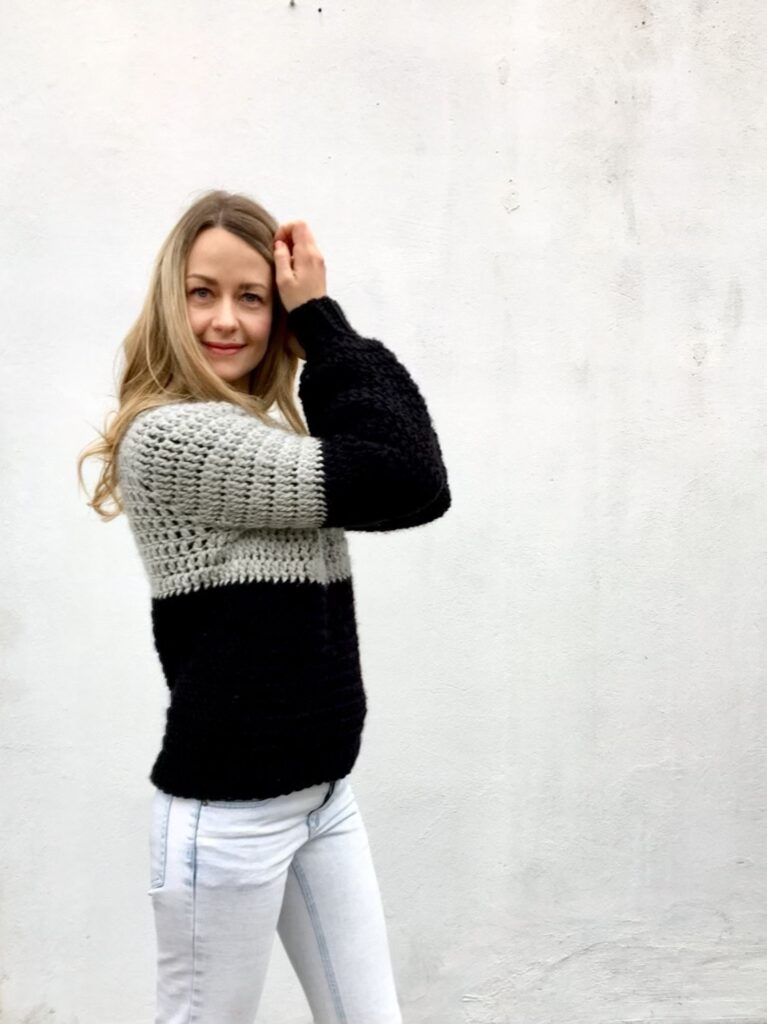
The Chunky Balloon Sweater is the ultimate easy crochet sweater for fall, winter, and spring. It’s such a cozy, warm, and super comfy sweater with a loose fit and gorgeous balloon sleeves! Wear it with whatever you want and make it in one ore two colors, just the ones you love.
why You’ll Love This crochet top pattern:
- No sewing: Worked as a raglan (try on as you go), top-down, sleeves crocheted directly on
- Fast project: Works up quickly due to the thick yarn
- Beginner-friendly: Basic stitches, repeating rows = minimal brain work 😉
- Personal adjustments: Adjust body and sleeves as preferred
PIN ME FOR LATER!
The story of the easy crochet sweater: The Chunky Balloon Sweater
It was a very cold winter day in November. She was really cold and the forecast for the weather told a story about a long and cold winter. So she got up and decided to go shopping for a warm woolen sweater.
She went to the stores, but every warm sweater she found was so expensive. Like way too expensive. She went home, still cold, without a sweater.
That’s the story of how I started thinking about making my this crochet sweater. At that time I only knew the basics of crochet, but I decided to try to make my own.
I bought some wool yarn and I simply just started crocheting.
I had no idea about what I was doing
…but I knew how I wanted it to look. And, luckily, somehow it turned out really great🤩
At some point, I posted a few pictures on Instagram and you guys just went crazy. Where did you get that crochet pattern?! you asked again and again. Well, there is no pattern. It’s just something I made up…
You really wanted the crochet pattern for my easy crochet sweater, so I started to write it down. Until this point, I had never made a crochet pattern before. So it took me a while to finish it.
When the crochet pattern for The Chunky Balloon Sweater was released you bought the pattern and in only a few months it had been downloaded hundreds of times. Let me tell you, I was shocked. So let me just say:
THANK YOU!
Thank you for loving this crochet pattern so much.
And to show my gratitude I’ve decided to publish the crochet pattern for The Chunky Balloon Sweater for free on my blog.
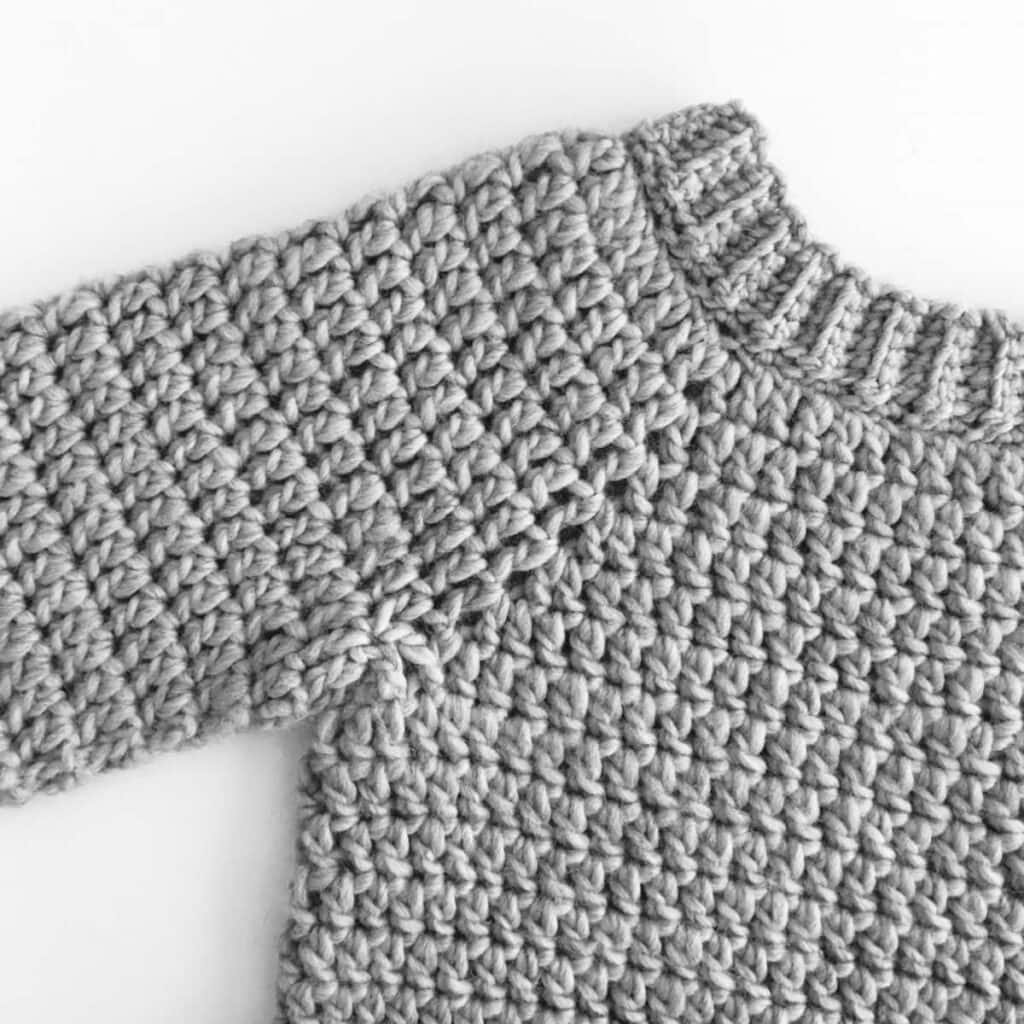
Construction
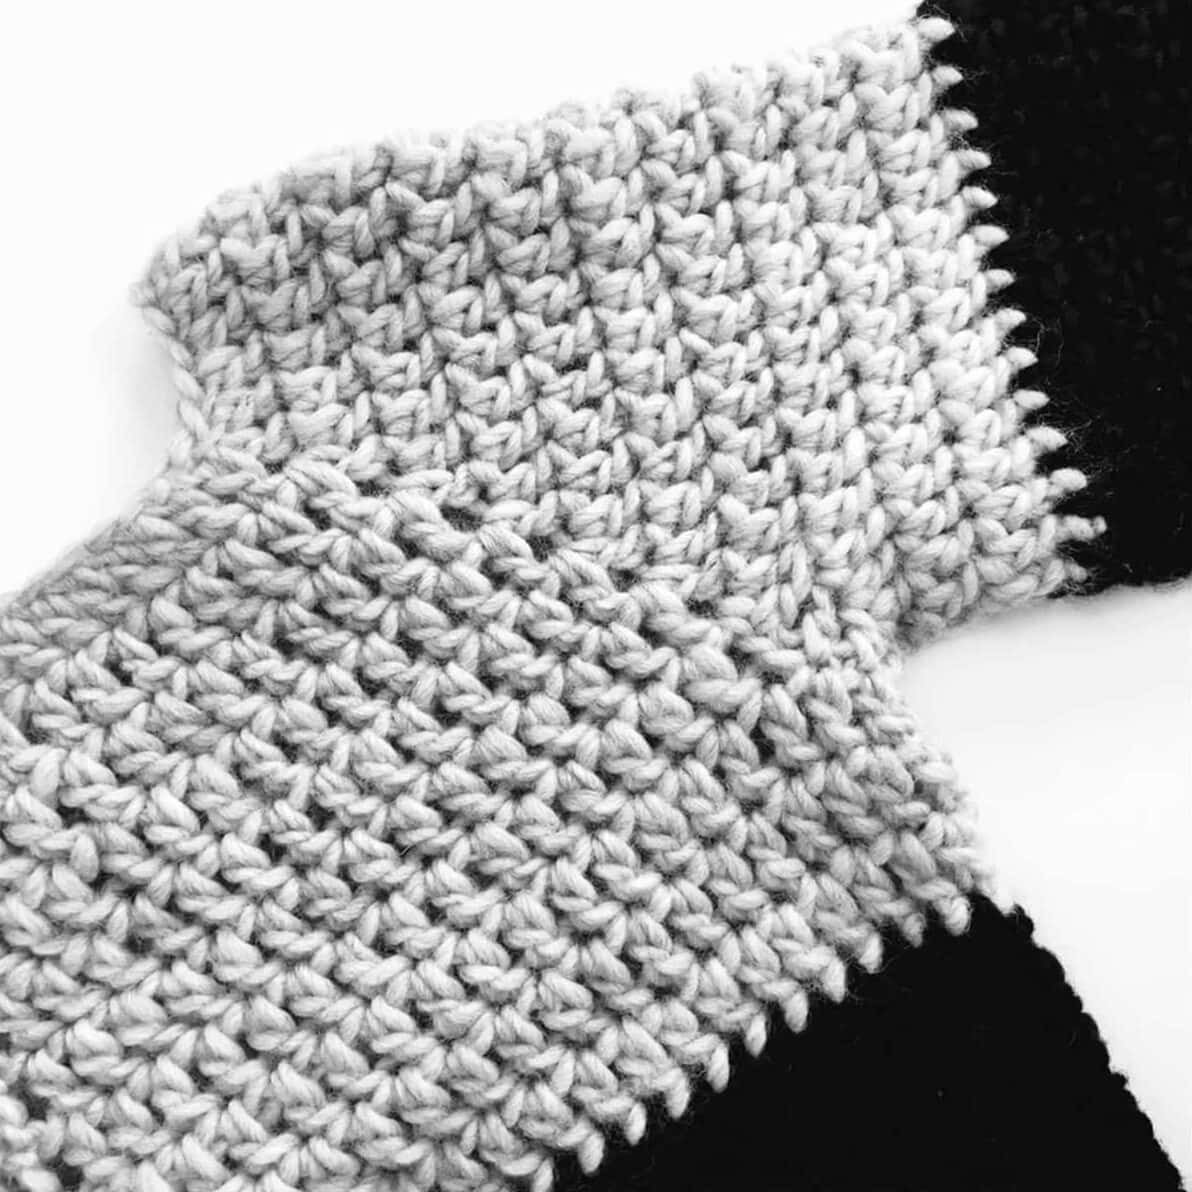
The Chunky Balloon Sweater is constructed in a very easy way and is a great pattern for those who want to try to make their first crochet sweater. Therefore there are no special stitches or hard-to-understand crochet terms and instructions.
This easy crochet sweater is made in one piece. That means no sewing anything together 😁 Great right!?
First
You start by crocheting the yoke. That means you crochet from the top down to the form of the body. A great thing about this construction is that you can try on your crochet sweater as you go.
It’s so fun to try on what you’re making to see the progress ☺️
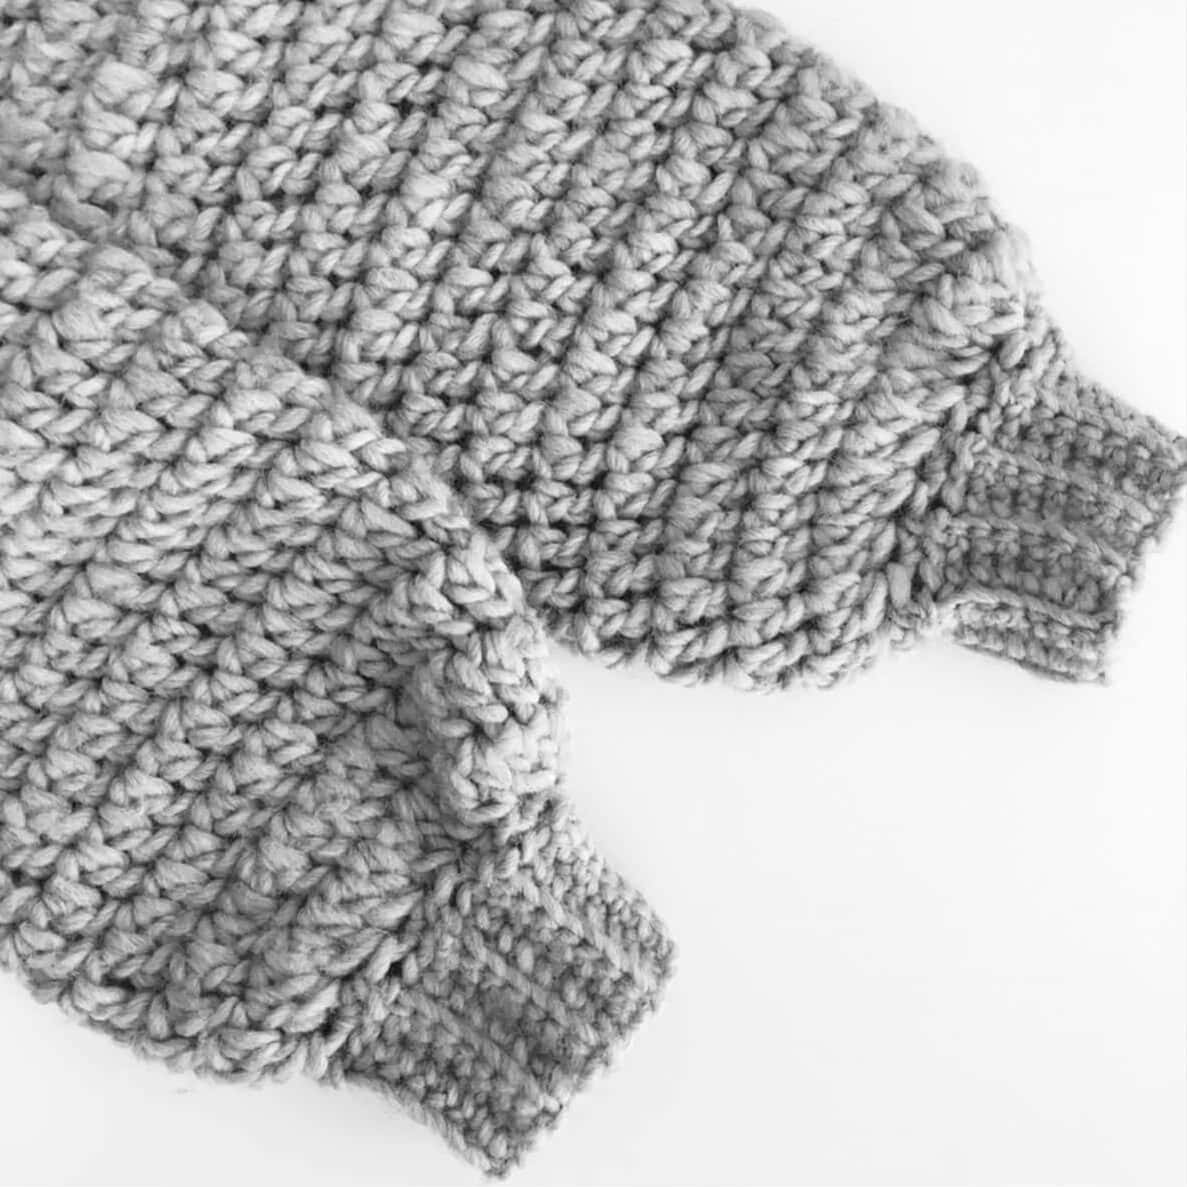
then
When you’re done with the body you crochet the sleeves directly onto your sweater. And when you’re done with the sleeves you continue making the ribbing on the sleeves.
Lastly
You then crochet the ribbing on the neck directly on the neckline. Could it really be any easier?
You can choose to make your sweater in one or two colors. Everything is described in the instructions below.
You can easily adjust the length of the sweater if you like the body of your Chunky Balloon Sweater shorter or longer. The same applies to the sleeves.

Prefer a clean printable version? Purchase the ad-free, printable PDF on my store (best pice), Etsy or Ravelry.
Skill level
Beginner
Sizing and measurements
These are the finished measurements of your garment, not your body measurements. Keep in mind that The Chunky Balloon Sweater is a loosely fitted garment.
Pattern includes 2 sizes (due to the oversized fit):
Size S/M (L/XL)
Sizes in cm:
Size S/M
Length – measured from neck to sweater bottom:
51 cm
Width – measured just below the sleeves:
48 cm
Sleeve length – measured under armpit towards wrist:
45 cm
Size L/XL
Length – measured from neck to bottom:
57 cm
Width – measured just below the sleeves:
53 cm
Sleeve length – measured under armpit towards wrist:
45 cm
The model in the pictures is wearing a size S/M of easy crochet sweater.
Tools
I’ve linked the ones I like to use right here:
Crochet hooks 7 mm and 8 mm
Darning needle
Scissors
Stitch markers
Yarn
Drops Snow
Yardage: 50 grams = 50 meters
Color codes:
53 (light grey)
02 (black)
The yarn is pure wool. It’s so lovely to work with and it’s so warm and cozy to wear. I absolutely loved making this easy crochet sweater using Drops Snow.
MATERIALS, one color
S/M: 700 grams
L/XL: 800 grams
MATERIALS, two colors
S/M: 250 grams (53) + 450 grams (02)
L/XL: 300 grams (53) + 500 grams (02)
ALTERNATIVES
Other Super Bulky / Super Chunky / 14 ply / 6-weight yarn, e.i. Drops Andes or 2 threads of Mayflower Easy Care Classic.
Gauge
(This is an expression of how tight your work is)
Body: 4” / 10cm square = 7 stitches wide x 5 rows tall in double crochet using hook size 8 mm
Ribbing: 4” / 10cm square = 12 stitches x 10 rows tall in sc blo using hook size 7 mm
Always make a test before you begin. If the gauge does not match the specified crochet hook, try changing to a larger or smaller one so that you find the hook with which you can achieve the specified gauge.
Pattern notes
Stitch counts for the different sizes are written in the order:
S/M (L/XL)
At the end of each row you can see the total number of stitches for each size as follows:
E.g. for the body:
(72)
Note that the ch 3 at the beginning of each row on the body and the sleeves do not count as a dc (tr).
Always read the pattern thoroughly. You will find an explanation of all abbreviations below, both US and UK terms. This crochet pattern uses US terms.
Abbreviations
st(s): stitch(es)
ch: chain
sc: single crochet (UK double crochet)
sl st: slip stitch
dc: double crochet (UK treble crochet)
sp(s): space(s)
V-st: 1 dc, ch 1, 1 dc – in the same st. Always crochet the V-st in the ch 1-sp from previous rnd
rnd(s): round(s)
blo: back loop only
Pssst! Download the FREE Crochet Stitch Abbreviation Guide. It contains information about abbreviations in 6 different languages.
Share your projects
I love to see your finished projects and WIPs! Use #chunkyballoonsweater #yippieyarnyay and tag @yippieyarnyay on Instagram to show off your work and have a chance to be featured.
Let’s move on to the pattern ☺️
Looking for more free crochet patterns?


Easy crochet sweater pattern instructions
Size S/M
The body is crocheted in the round. When it’s done you crochet the sleeves directly on.
Body
Use hook 8 mm. Ch 65. Join with sl st to first ch.
Be aware that the foundation ch for your crochet sweater is not twisted. Also, be aware that the foundation ch is not too loose or else the neck opening will be too big.
Rnd 1: Ch 3, 9 dc, V-st, 13 dc, V-st, 18 dc, V-st, 13 dc, V-st, 7 dc, sl st in 3. ch (72 – including dc and ch in V-st)
Rnd 2: Ch 3, 10 dc, V-st (remember to crochet the V-st in the ch 1-sp), 15 dc, V-st, 20 dc, V-st, 15 dc, V-st, 8 dc, sl st i 3. ch (80)
Rnd 3: Ch 3, 11 dc, V-st, 17 dc, V-st, 22 dc, V-st, 17 dc, V-st, 9 dc, sl st in 3. ch (88)
Rnd 4: Ch 3, 12 dc, V-st, 19 dc, V-st, 24 dc, V-st, 19 dc, V-st, 10 dc, sl st in 3. ch (96)
Rnd 5: Ch 3, 13 dc, V-st, 21 dc, V-st, 26 dc, V-st, 21 dc, V-st, 11 dc, sl st in 3. ch (104)
Rnd 6: Ch 3, 14 dc, V-st, 23 dc, V-st, 28 dc, V-st, 23 dc, V-st, 12 dc, sl st in 3. ch (112)
Now you will be dividing the sleeves and body:
Rnd 7: Ch 3, 15 dc, 1 dc in ch 1-sp in first V-st, ch 5 (armhole), 1 dc in next ch 1-sp in V-st, 30 dc, 1 dc in ch 1-sp in next V-st, ch 5 (armhole), 1 dc in ch 1-sp in next V-st, 13 dc, sl st in 3. ch (72)
Continue making the body:
Rnd 8: Ch 3, 1 dc in each st, sl st in 3. ch (72)
Rnd 9-20: Repeat rnd 8 – 12 rnd(s) (72)
If you wish to change color do it after rnd 10.
Do NOT break yarn and continue making the ribbing.
Ribbing
Use hook 7 mm. Ch 6.
Row 1: Start in 2. ch from hook, 5 sc, 2 sc along the edge, turn
Row 2: Skip 2 sc, 5 sc blo, ch 1, turn
Row 3: 5 sc blo, 1 sc along the edge, turn
Row 4: Skip 1 sc, 5 sc blo, ch 1, turn
Row 5: 5 sc blo, 2 sc along the edge , turn
Row 6: Skip 2 sc, 5 sc blo, ch 1, turn
Repeat row 3 to 6 all the way around the edge. You end with making row 6.
Continue like this:
5 sc towards the edge of the body, sl st into 2. sc from last rnd along the edge, ch 1, turn.
Crochet ribbing together with 5 sc in both loops.
Fasten off and weave in ends.
Ribbing at neckline
Use hook 7 mm. Add the yarn on the back at rnd 1. Ch 6.
Row 1: Start in 2. ch from hook, 5 sc, 2 sc along the neckline (make sure that the 2 sc are right above the rnd 1 on the body), ch 1, turn
Row 2: Skip 2 sc, 5 sc blo, ch 1, turn
Row 3: 5 sc blo, 2 sc along neckline, ch 1, turn
Repeat row 2 and 3 all the way around until 1 ch is left. You end with making row 2.
Continue like this:
4 sc, 2 sc together (crochet the 5. sc and the last ch in the neckline together), ch 1, turn.
Crochet ribbing together with 5 sc in both loops.
Fasten off and weave in ends.
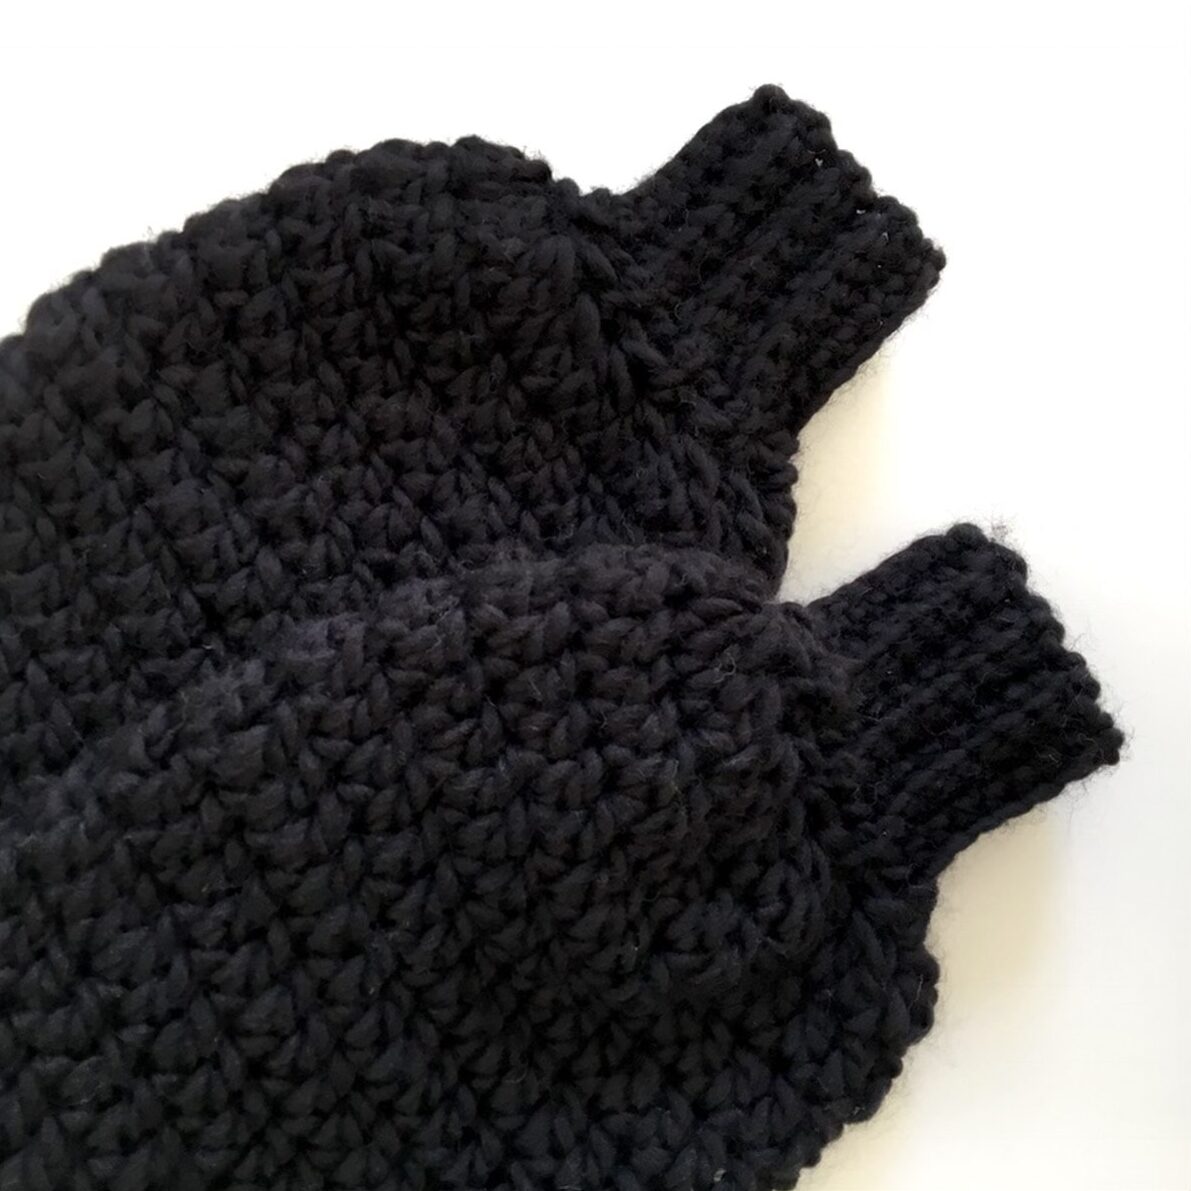
Sleeves
Use hook 8 mm. Add the yarn in 3. ch under the arm.
Rnd 1: Ch 3, 2 dc, 2 dc together (crochet the first unfinished dc at the edge of rnd 7 on the body, make the next in the dc), 23 dc, 2 dc together (as above, only opposite), 2 dc, sl st in 3. ch (29)
Rnd 2: Ch 3, 29 dc, sl st in 3. ch (29)
Rnd 3-10: Repeat rnd 2 (29)
Rnd 11: Ch 3, 14 dc, 2 dc in next, 13 dc, 2 dc in next, sl st in 3. ch (31)
Rnd 12: Ch 3, 31 dc, sl st in 3. ch (31)
Rnd 13-17: Repeat rnd 12 (31)
Rnd 18: Ch 3, 2 dc together 15 times, 1 dc, sl st in 3. ch (16)
If you wish to change color do it after rnd 4. Do NOT break yarn.
Ribbing at wrist
Use hook 7 mm. Ch 9.
Row 1: Start in 2. ch from hook, 8 sc, 2 sc along the wrist, turn
Row 2: Skip 2 sc, 8 sc blo, ch 1, turn
Row 3: 8 sc blo, 2 fm along the wrist, ch 1, turn
Repeat row 2 and 3 all the way around the sleeve. You end with making row 2.
Continue like this:
8 sc in blo towards the wrist. Sl st in 2. sc from the previous row along the wrist, ch 1, turn.
Crochet ribbing together with 8 sc in both loops.
Fasten off and weave in ends.
Size L/XL
The body is crocheted in the round. When it’s done you crochet the sleeves directly on.
Body
Use hook 8 mm. Ch 65. Join with sl st to first ch.
Be aware that the foundation ch for your crochet sweater is not twisted. Also, be aware that the foundation ch is not too loose or else the neck opening will be too big.
Rnd 1: ch 3, 9 dc, V-st, 13 dc, V-st, 18 dc, V-st, 13 dc, V-st, 7 dc, sl st in 3. ch (72 – including dc and ch in V-st)
Rnd 2: ch 3, 10 dc, V-st (remember to crochet the V-st in the ch 1-sp), 15 dc, V-st, 20 dc, V-st, 15 dc, V-st, 8 dc, sl st in 3. ch (80)
Rnd 3: ch 3, 11 dc, V-st, 17 dc, V-st, 22 dc, V-st, 17 dc, V-st, 9 dc, sl st in 3. ch (88)
Rnd 4: ch 3, 12 dc, V-st, 19 dc, V-st, 24 dc, V-st, 19 dc, V-st, 10 dc, sl st in 3. ch (96)
Rnd 5: ch 3, 13 dc, V-st, 21 dc, V-st, 26 dc, V-st, 21 dc, V-st, 11 dc, sl st in 3. ch (104)
Rnd 6: ch 3, 14 dc, V-st, 23 dc, V-st, 28 dc, V-st, 23 dc, V-st, 12 dc, sl st in 3. ch (112)
Rnd 7: ch 3, 15 dc, V-st, 25 dc, V-st, 30 dc, V-st, 25 dc, V-st, 13 dc, sl st in 3. ch (120)
Rnd 8: ch 3, 16 dc, V-st, 27 dc, V-st, 32 dc, V-st, 27 dc, V-st, 14 dc, sl st in 3. ch (128)
Now you will be dividing the sleeves and body:
Rnd 9: ch 3, 17 dc, 1 dc in ch 1-sp in first V-st, ch 5 (armhole), 1 dc in next ch 1-sp in V-st, 34 dc, 1 dc in ch 1-sp in next V-st, ch 5 (armhole), 1 dc in ch 1-sp in next V-st, 15 dc, sl st in 3. ch (80)
Continue making the body:
Rnd 10: ch 3, 1 dc in each st, sl st in 3. ch (80)
Rnd 11-23: repeat 10. rnd – 13 rnd (80)
If you wish to change color do it after rnd 10.
Do NOT break yarn and continue making the ribbing.
Ribbing
Use hook 7 mm. Ch 6.
Row 1: start in 2. ch from hook, 5 sc, 2 sc along the edge, turn
Row 2: skip 2 sc, 5 sc blo, ch 1, turn
Row 3: 5 sc blo, 1 sc along edge, turn
Row 4: skip 1 sc, 5 sc blo, ch 1, turn
Row 5: 5 sc blo, 2 sc along the edge , turn
Row 6: skip 2 sc, 5 sc blo, ch 1, turn
Repeat row 3 to 6 all the way around the sleeve. You end with making row 6.
Continue like this:
5 sc towards the edge of the body, sl st into 2. sc from last rnd along the edge, ch 1, turn.
Crochet ribbing together with 5 sc in both loops.
Fasten off and weave in ends.
Ribbing at neckline
Add the yarn on the back at 1. rnd. Use hook 7 mm. Ch 6.
Row 1: start in 2. ch from hook, 5 sc, 2 sc along the neckline (make sure that the 2 sc are right above the rnd 1 on the body), ch 1, turn
Row 2: skip 2 sc, 5 sc blo, ch 1, turn
Row 3: 5 sc blo, 2 sc along neckline, ch 1, turn
Repeat row 2 and 3 all the way around until 1 ch is left. You end with making row 2.
Continue like this:
4 sc, 2 sc together (crochet the 5. sc and the last ch in the neckline together), ch 1, turn.
Crochet ribbing together with 5 sc in both loops.
Fasten off and weave in ends.
Sleeves
Add the yarn in 3. ch under the arm. Use hook 8 mm.
Rnd 1: ch 3, 2 dc, 2 dc together (crochet the first unfinished dc at the edge of rnd 9 on the body, make the next in the dc), 27 dc, 2 dc together (as above, only opposite), 2 dc, sl st in 3. ch (33)
Rnd 2: ch 3, 33 dc, sl st in 3. ch (33)
Rnd 3-10: repeat rnd 2 (33)
Rnd 11: ch 3, 16 dc, 2 dc in next, 15 dc, 2 dc in next, sl st in 3. ch (35)
Rnd 12: ch 3, 35 dc, sl st in 3. ch (35)
Rnd 13-17: repeat rnd 12 (35)
Rnd 18: ch 3, 2 dc together 17 times, 1 dc, sl st in 3. ch (18)
If you wish to change color do it after rnd 4. Do NOT break yarn.
Ribbing at wrist
Use hook 7 mm. Ch 9.
Row 1: start in 2. ch from hook, 8 sc, 2 sc along the wrist, turn
Row 2: skip 2 sc, 8 sc blo, ch 1, turn
Row 3: 8 sc blo, 2 fm along the wrist, ch 1, turn
Repeat row 2 and 3 all the way around the sleeve. You end with making row 2.
Continue like this:
8 sc in blo towards the wrist. Sl st in 2. sc from the previous row along the wrist, ch 1, turn.
Crochet ribbing together with 8 sc in both loops.
Fasten off and weave in ends.
Share your own easy crochet sweater
Happy crocheting! 🧶✨
xx Sharlene
If you enjoyed this pattern, you may also like these patterns:
- Super Easy Crochet Beanie for beginners
- The Cadence Cardigan – gorgeous color block cardi
- Everyday Easy Crochet Cardigan – Perfect for beginners
- The bubblelicious Hubba Bubba Cardigan
- Monday Sweater – Chunky and cozy
Follow me:
Sharing is caring:
This sweater is really easy to make, even for a beginner like me! The guide is easy to follow and understand, but if you have any questions, Sharlene is very helpfull, and will do her best to help you through any bumps on your crochet journey. Big recommendation!
Also, I actually went and bought the pattern because it’s way easier to have in a PDF format on your computer 😀
Hi Alberte
Thank you so much for your kind words! I’m so so happy you like the pattern and you found it beginner-friendly. That was my goal ☺️ And thank you for supporting my work 😀 I’m truly grateful!
xx Sharlene
Hi Sharlene, love this pattern but I have a question. Is the joining point at the center back supposed to be a straight line from top to bottom? Mine is going in an angle towards the left. This is after multiple tries. It will not go straight.
Thank you, Pat
Hi Pat,
Thank you so much for your kind words! I really appreciate it 🙂 Since you’re working in the round the angle will go to the left just as you see on your sweater. But if you joining point is very visible you need to make your chains tighter and it will become less visible.
xx Sharlene
This has become my new favourite crochet pattern! I’m working on my third one now. my next purchase is definitely going to be the paid pattern so I have an easier reference for my fourth sweater, and because it definitely deserves the $10 it costs!
Great pattern!
Hi Mel,
Thank you so much. A comment like yours is what makes me want to keep on crocheting new designs.
I would love to see your sweaters. Please send a couple pictures my way. You can reply directly to my newsletter or tag me on socials.
Thanks,
Sharlene